What Causes a Faucet to Drip: Quick, Clear DIY Fix
Discover what causes faucet to drip and how to diagnose and fix common issues like worn cartridges, faulty washers, or dirty aerators. This urgent, step-by-step guide helps homeowners stop leaks fast.

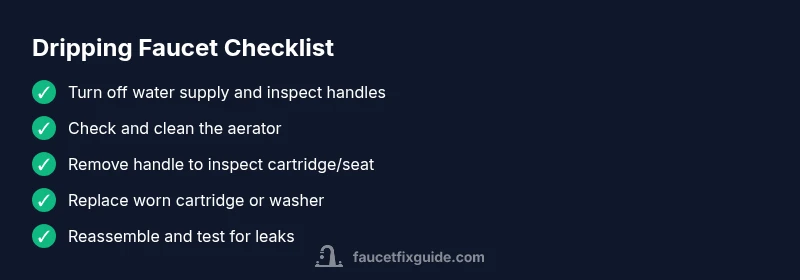
According to Faucet Fix Guide, a dripping faucet is usually caused by a worn cartridge, a loose packing nut, or a faulty washer. Start by tightening connections and inspecting the aerator; if water still drips, replace the cartridge or washer. This quick flow helps homeowners pinpoint the culprit and start a safe, DIY fix.
Why faucets drip
A faucet that continues to drip can waste water and money, and it signals a mechanical issue inside the valve assembly. The most common culprits are worn or damaged parts that fail to seal fully when the handle is turned off. Understanding the root causes—such as a degraded cartridge, worn washers, or a compromised O-ring—helps you choose the right fix. By addressing the right component, you’ll stop the drip and extend the faucet’s life. This is why diagnosing the exact cause matters so much for homeowners and DIY enthusiasts.
Common causes by faucet type
Single-handle faucets often drip due to a worn cartridge or O-ring that no longer seals against water pressure. Two-handle faucets might leak at the seat or stem where the handles join the valve. In both cases, mineral buildup can worsen sealing surfaces, and loose packing nuts can allow small leaks around the stem. Identifying the faucet type guides you to the most likely culprit and streamlines your repair process.
Quick home checks you can do safely
Before disassembly, turn off the supply valves under the sink and open the faucet to relieve pressure. Check the aerator screen for mineral buildup and remove it if clogged; clean or replace as needed. If the drip persists, lightly tighten the packing nut on the stem with an appropriate wrench, then re-check. Remember: avoid overtightening, which can strip threads or crack components. These simple checks often stop a drip without replacing parts.
Identifying the culprit by symptoms
If water stops briefly when you tighten the handle, the issue is often the washer or O-ring. If a steady stream continues after shutoff, the cartridge or valve seal is likely failing. Drips that occur only after several hours may indicate mineral buildup supporting a slow seep. Keep notes on when the drip happens and what part you were adjusting; these details help you or a professional pinpoint the fix more quickly.
When to replace cartridges vs washers
Cartridges control modern faucet internals and often wear out first, especially in high-use kitchens. Washers and seat seals are common in older two-handle models and can degrade over time. If you hear a hammering sound or see mineral crust on the seat, it’s a sign you should replace the corresponding cartridge or washer. Replacements are generally straightforward for many models, but some brands require specific parts.
Safety and prevention tips
Always shut off the main water supply if you need to disassemble significant components. Keep a towel handy to catch drips and work over a tray to prevent water damage. After repairs, test the faucet at various pressures to ensure a complete seal. Regular maintenance—cleaning aerators, inspecting seals, and replacing worn parts—prevents future drips and saves water in the long run.
Steps
Estimated time: Total time: 60-90 minutes
- 1
Gather tools and turn off water
Collect adjustable wrench, screwdriver, pliers, replacement cartridge or washers, and plumber’s grease. Shut off both the hot and cold water valves under the sink and open the faucet to relieve pressure. Have a towel ready for any residual drips.
Tip: Label parts as you remove them to simplify reassembly. - 2
Remove the faucet handle
Use a screwdriver to remove the handle screw and lift the handle away from the valve. If there’s a decorative cap, pry it gently with a thin blade. Inspect the stem for corrosion or wear.
Tip: Take a photo of the assembly before disassembly for reference. - 3
Inspect the cartridge and seals
Slide out the cartridge or identify the type of washer and O-ring. Look for cracks, pitting, or mineral buildup. Clean surfaces with a mild vinegar solution if mineral deposits are stubborn.
Tip: Do not use abrasive cleaners that could scratch seats. - 4
Replace worn parts
Install a new cartridge or washer, and replace O-rings if damaged. Use plumber’s grease on o-rings to ensure a snug seal. Reassemble in reverse order of disassembly.
Tip: Ensure the cartridge aligns with the valve body before securing. - 5
Reassemble and test
Reattach the handle, turn on the water supply, and test the faucet at different pressures. Check for drips at the handle and at the base. If the leak persists, revisit the cartridge or seat area.
Tip: Run the faucet for a few minutes to flush out debris. - 6
Fine-tune and reseal
Tighten any packing nuts a quarter-turn at a time and recheck. If leakage remains, replace the packing washer or adjust the seating of the cartridge.
Tip: Avoid overtightening; excessive compression can damage threads. - 7
Document and maintain
Make a maintenance note: part numbers, date of repair, and any observations. Schedule periodic aerator cleaning and seal inspections to prevent future drips.
Tip: Set a reminder to check seals annually.
Diagnosis: Faucet drips continuously after turning off or leaks when the handle is operated.
Possible Causes
- highWorn or damaged faucet cartridge
- mediumLoose packing nut or bonnet
- lowDamaged O-ring or valve seat
Fixes
- easyTighten the packing nut/bonnet snugly, then re-test for leaks
- mediumReplace the faucet cartridge with a compatible model
- mediumReplace damaged O-ring or valve seat as needed
Frequently Asked Questions
What causes faucet to drip?
Drips are typically caused by a worn cartridge, a faulty washer, or a damaged O-ring. Mineral buildup and loose connections can also contribute. Identifying the exact culprit helps you apply the correct fix.
Most drips come from worn cartridges or washers, with other causes including mineral buildup and loose parts.
Can I fix a dripping faucet myself?
Yes, many drips can be repaired with basic tools and replacement parts. If you’re unsure about part compatibility or feel unsure about plumbing best practices, follow a trusted guide or consult a professional.
Yes, you can often fix it yourself with basic tools and parts.
What tools do I need to fix a faucet?
Common tools include an adjustable wrench, screwdriver, pliers, replacement cartridge or washer, and plumber’s grease. Having a towel and tray helps manage spills.
You’ll typically need a wrench, screwdriver, pliers, replacement parts, and grease.
How long does a faucet repair take?
Most repairs take 20 to 60 minutes, depending on faucet type and part availability. More complex models can take longer if special tools are required.
Usually between 20 and 60 minutes.
Should I hire a plumber?
If you can’t shut off water, if the leak is behind a wall, or if you lack the right tools or parts, it’s wise to call a plumber. For straightforward cartridge or washer replacements, DIY is often fine.
Call a plumber if you can't stop the drip or if the leak is hard to access.
How can I prevent faucet drips in the future?
Regular maintenance like cleaning aerators, replacing worn cartridges or washers on schedule, and inspecting seals can prevent most drips from developing.
Regular maintenance helps prevent drips.
Watch Video
Top Takeaways
- Identify the exact leak source before replacing parts.
- Tighten connections safely, then test for drips.
- Replace worn cartridges or washers to stop most drips.
- Test under different pressures to confirm a full seal.
- Maintain regularly to prevent future drips.