How to Remove Shower Faucet: A DIY Guide
Learn how to remove shower faucet safely with our step-by-step guide. This tutorial covers preparation, tool selection, and a clear removal process for common shower valves. Follow these instructions to replace cartridges, service leaks, or upgrade your shower control with confidence.

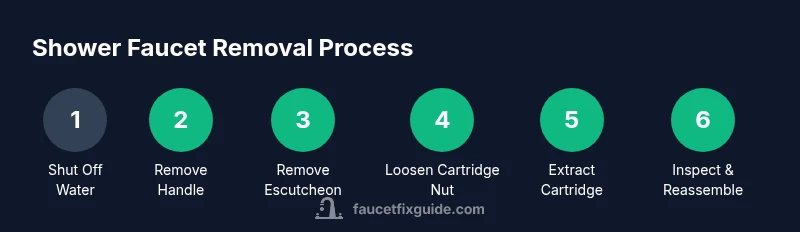
By the end you’ll safely remove a shower faucet and prepare for replacement or repair. Start by shutting off the water supply and relieving pressure, then gather basic tools. Next, follow a clear sequence: remove the handle, detach the escutcheon, loosen the cartridge nut, lift out the cartridge, and inspect for wear before reassembly. According to Faucet Fix Guide, a calm, methodical approach minimizes damage and makes reassembly easier.
Understanding Shower Faucet Types
Shower faucets come in several common types, including cartridge, ceramic disk, compression, and thermostatic valves. Each type uses a slightly different mechanism, but the core idea remains the same: access the valve body, identify fasteners, and extract the working cartridge or stem without forcing parts. Knowing your valve type helps you choose the right tools, avoid damage, and select compatible replacement parts. If you’re unsure, start by removing the decorative handle and escutcheon to inspect the stem and screws. The term 'how to remove shower faucet' covers these variants, so approach with patience and a clear plan. Brand variations exist, but the goal is universal: access internals, replace worn parts, and restore reliable water control. According to Faucet Fix Guide, understanding the valve type reduces guesswork and speeds up the repair process.
Safety and Preparation
Before you touch plumbing, shut off the main water supply if possible, or at least the hot and cold supply to the shower. Relieve pressure by running cold water from a nearby fixture. Gather your tools and take photos of each assembly before disassembly. Use protective eye wear and gloves to guard against sharp edges and corrosion. Work in a well-lit area, keep fasteners in labeled containers, and avoid twisting pipes or forcing parts that resist turn. The goal is to minimize water leakage and avoid accidental damage to the valve or shower thermostat if present. Remember, proper preparation reduces the risk of costly mistakes when learning how to remove shower faucet.
Tools and Materials You Might Need
Depending on your valve type, you’ll use a few common tools: an Allen wrench set, screwdriver set (flathead and Phillips), adjustable wrench, pliers, a replacement cartridge or stem if needed, plumber’s tape, and a small container for screws. Keep a soft cloth ready to wipe away mineral buildup. For certain stems, you might need a cartridge removal tool or a strap wrench if the nut is tight. If the faucet uses a decorative trim, have a trim remover tool and possibly a heat gun for stubborn finishes. Having these items on hand makes the actual removal smoother and reduces delays caused by missing hardware.
Step-by-Step Removal Overview
Access starts with removing the handle and escutcheon to reveal the stem. Then locate and loosen the retaining nut or clip that holds the cartridge or stem in place. Carefully pull the cartridge or stem straight out, noting its orientation. Inspect O-rings and seals for wear and replace as needed. Clean any mineral buildup from the valve body before installing a new cartridge or reassembling. Finally, reinstall the escutcheon and handle, restore water supply, and test for leaks. This overview aligns with how to remove shower faucet in most residential setups, but always refer to your valve’s manufacturer guidance for model-specific steps.
Common Issues and How to Handle Them
Stubborn screws can strip; apply penetrating oil and pause if needed. Corroded retaining clips may require gentle prying with a plastic scraper to avoid scratching metal. If the cartridge won’t budge, apply steady, even pressure after loosening any set screws. Mineral buildup can hamper movement; soak a worn cartridge in vinegar or use a commercial cleaner, but never soak plastic components beyond manufacturer recommendations. If you accidentally disassemble beyond your plan, take photos, label each piece, and step back to re-evaluate before forcing parts back together. Each issue has a careful solution that preserves the valve’s integrity.
Reassembly, Testing, and Next Steps
After installing a new cartridge or reassembling the stem, reattach the escutcheon and handle in the correct orientation. Turn on the water supply slowly to avoid a rush of air and watch for leaks at every joint. Bleed the lines by running both hot and cold briefly, then adjust temperature and flow to the desired setting. If you replaced a cartridge, prime the cartridge by running water for a minute to clear any debris. Finish by cleaning the trim and applying plumber’s tape to threaded connections if needed. If leaks persist, you may need to re-check seating or consult a professional.
Tools & Materials
- Allen wrench set(Include sizes for common screws (e.g., variable range))
- Screwdrivers (flathead and Phillips)(Have both on hand)
- Adjustable wrench(Wide jaw helps with various fittings)
- Pliers(Needle-nose for precision work)
- Cartridge removal tool (if required)(Model-specific)
- Replacement cartridge or stem(Check compatibility with valve)
- Plumber’s tape(Teflon tape for threaded connections)
- Soft cloth or rag(Wipe mineral buildup and spills)
- Small container for screws(Label and store fasteners)
- Penetrating oil (optional)(Use if screws are rusted)
- Safety glasses(Eye protection during disassembly)
Steps
Estimated time: 30-60 minutes
- 1
Turn off water and prep
Shut off the shower’s water supply at the valve or main line and relieve pressure by running cold water elsewhere. Gather tools and materials, and clear the area for safe access.
Tip: Verify shutoff valves before starting; a surge currently can surprise you. - 2
Remove the handle
Use the appropriate screwdriver or hex key to release the set screw and slide the handle off the stem.
Tip: Take a photo of the handle’s orientation for reassembly. - 3
Remove the escutcheon
Gently pry off the decorative escutcheon or trim plate to expose the stem and fasteners.
Tip: Be careful not to scratch the surrounding wall or tile. - 4
Access the cartridge or stem
Identify the retaining nut or clip that holds the cartridge or stem in place and loosen it.
Tip: If clips are stubborn, don’t pry with metal tools that can damage parts. - 5
Extract the cartridge or stem
Carefully pull the cartridge or stem straight out, noting its orientation for correct reinstallation.
Tip: Inspect O-rings and seals for wear and replace as needed. - 6
Inspect and replace wear parts
Check O-rings, seals, and seats for wear; replace worn components with matched parts.
Tip: Lubricate O-rings lightly with silicone grease before reinstalling. - 7
Reassemble and test
Reattach the cartridge or stem, escutcheon, and handle; restore water and test for leaks at all joints.
Tip: Run both hot and cold to confirm smooth operation.
Frequently Asked Questions
What is the easiest way to remove a shower faucet?
The easiest way is to start with the handle and escutcheon removal, then locate the retaining mechanism and carefully extract the cartridge. Keep track of screws and orientation for reassembly.
Start by removing the handle and escutcheon, then loosen the cartridge retainer and lift out the cartridge.
Should I shut off water supply to the whole house or just the shower?
Shut off at least the shower’s local supply; if the water is hard to control, shut off the main. Relieve pressure before touching any fittings.
Always shut off the water to the shower, and if possible turn off the main to relieve pressure.
What tools do I need for shower faucet removal?
Common tools include Allen wrenches, screwdrivers, an adjustable wrench, and pliers. Some models require a cartridge removal tool or special trim tools.
You’ll typically need Allen wrenches, screwdrivers, and a wrench; a cartridge tool may be required for some models.
What should I do if the cartridge won’t come out?
Apply gentle, steady pressure after loosening any retaining hardware. If stubborn, apply a small amount of penetrating oil and wait a few minutes before retrying.
If it’s stuck, wait a bit after loosening the clip, then try again with steady pressure.
Is it necessary to call a plumber for cartridge replacement?
Not always. If you’re comfortable with basic tools and the valve type is compatible, you can replace the cartridge yourself. If leaks persist, seek professional help.
Most cartridge replacements can be DIY, but persistent leaks mean a pro should check the valve seating.
Top Takeaways
- Identify your valve type before disassembly.
- Shut off water and relieve pressure first.
- Inspect wear parts and replace as needed.
- Test thoroughly for leaks after reassembly.